AxDDM2
AxDDM2 is an advanced depth and video monitoring software developed specifically for AXSUB® products. It transforms the AxVIEW into a powerful diver control platform, equipping supervisors for safer and more efficient diving operations.
Key Features
Video Preview
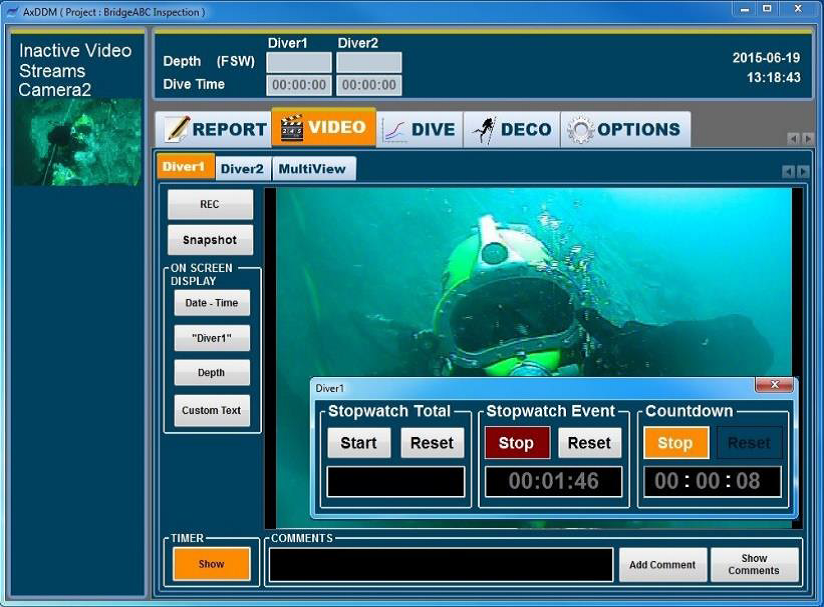
The video preview for each camera can be seen in the corresponding Diver page of the Video tab. The previews are designed to always keep their height to width ratio. This way, the main window can be resized at any time without losing the video’s proportions. The video preview will always adapt itself to best fit the screen, thus if the width limits the size, the video will take all width and fill empty space with black borders, and if the height limits the size, the video will take all height and fill empty space with black borders
Snapshot
To take a picture of what is currently shown by the camera, click the Snapshot button. A preview window will appear on screen to show the taken picture for a definite amount of seconds and will then close automatically. The display time can be set in the Video Options tab.
On Screen Display
The OSD (on screen display) buttons are used to add text on the top left corner of the video. There are 3 pre-set OSD texts that can be added, which are the date and time, the diver number and the current depth with units. When clicked, their buttons will turn red to indicate their new status. There is a fourth OSD button that allows user to add custom text. When clicked, this button will open a window with a textbox to write the custom text.
Timers
The Video tab contains basic timer tools to help supervisors during dive. The button Show of the Timer box will open a window containing 2 stopwatches and 1 countdown timer.
Multi View
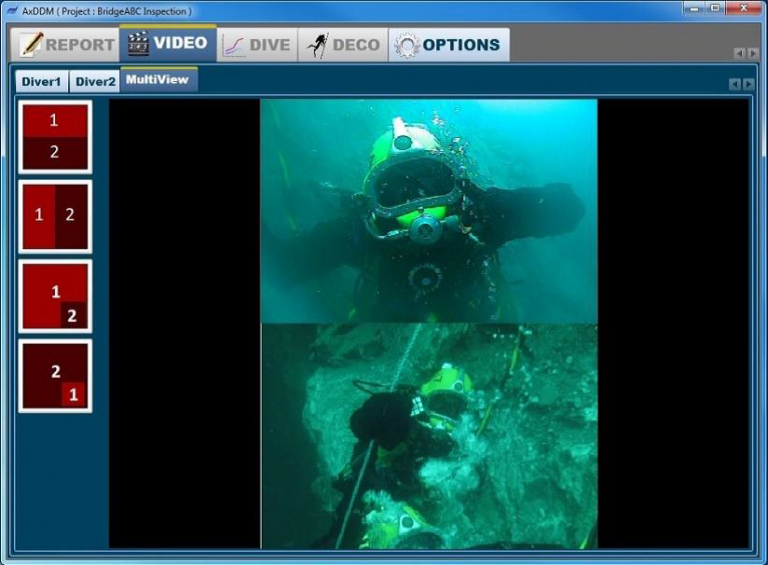
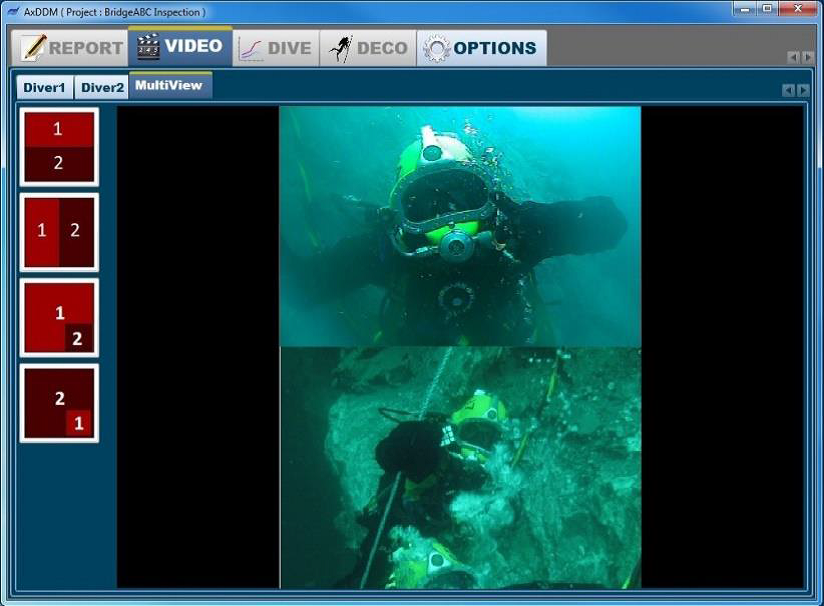
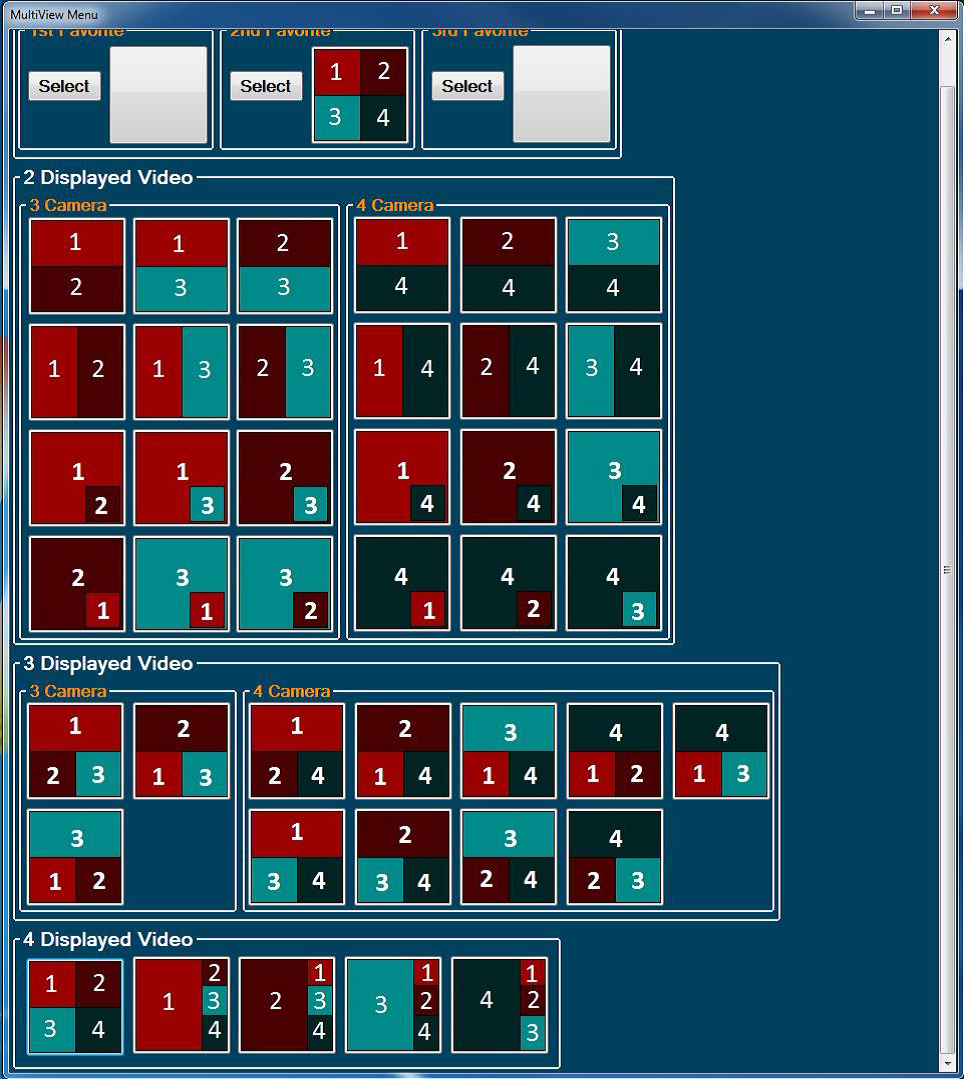
To display both video streams in the main panel, simply select the MultiView page of the Video tab and choose one of the four possible configurations by clicking the corresponding button.
Start New Dive
Here on the dive table you will be able to start loggin depth by clicking on Start Dive button. Once clicked, the text will change to Finish Dive and it will turn red to indicate that the depth is logging. The Dive Time timer and the Bottom Time timer will also start when the Start Dive button is clicked.
Axis Properties
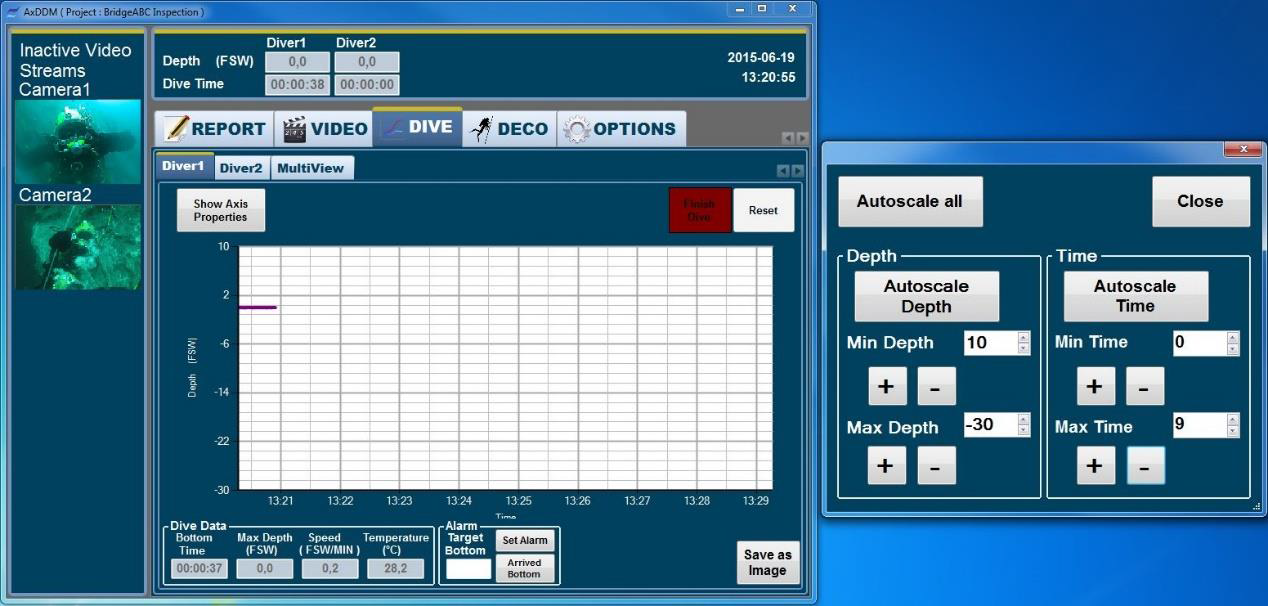
By default, the chart’s axis are auto-scaled to best fit the depth curve. It is however possible to use custom axis values on the depth chart. Click on the Show Axis Properties button to display the axis settings.
Bottom Alarm
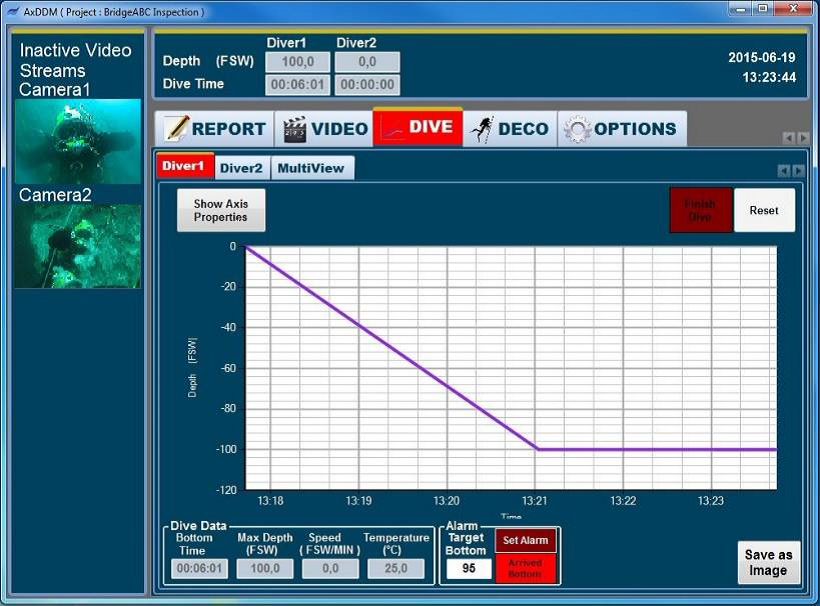
The target bottom alarm is a tool made available to the supervisor to remember to click on the Arrived Bottom button when the diver reaches the bottom, thereby printing the time for this event on the report. To set the target bottom, write the target value in the textbox then click on the Set Alarm button. The button will turn red to indicate that the alarm is set. When the alarm is triggered, the Dive tab will start flashing yellow and red, as well as the Diver page for which the alarm is set. This way, the user will know exactly where to go to stop the alarm. Click on the Arrived Bottom button to shut the alarm.
Save Chart as Image
At any time, the depth chart can be saved as a JPEG file containing the chart with its current axis values by clicking on the Save as Image button.
Finish/Reset Dive
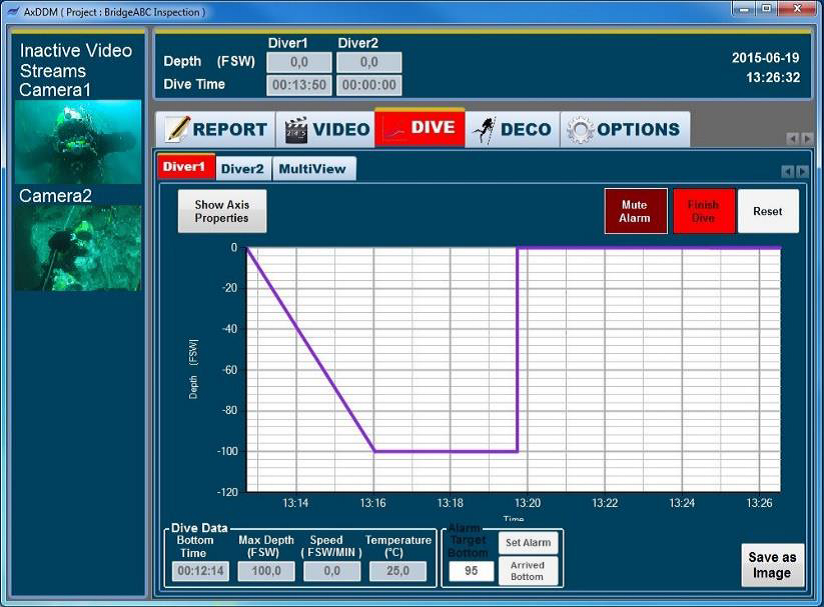
Clicking the Finish Dive button means that the diver is back to surface. When clicked, this button will stop depth logging, stop the Dive Time timer and will enable the option to move decompression to a chamber.
Decompression without table
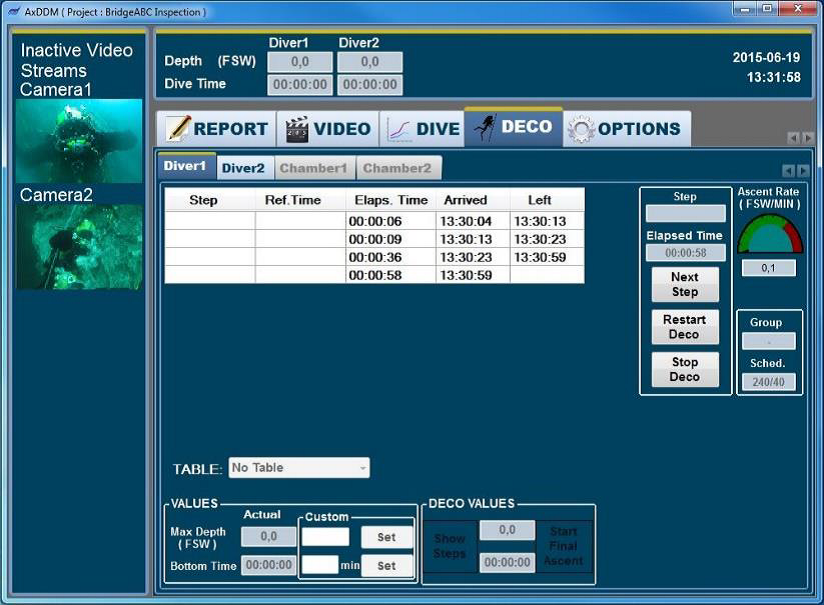
If no decompression table is selected prior to click on the Start Final Ascent button, step timers will still be available to log the elapsed step time. There won’t be any step name or reference time, but times at which the steps are reached or quitted will be logged. Thus, when printing the decompression spreadsheet on the report, it is possible to fill the missing cells by hand. As with decompression using tables, click on the Next Step button to go to the next step, and click on the Stop Deco button when decompression is complete.
Move to chamber
When the Finish Dive button of the Dive tab is clicked, the Move to Chamber button will appear in the corresponding Deco tab page. This button transfers all dive data to be printed on report to a new chamber tab.
Pre-Dive Page
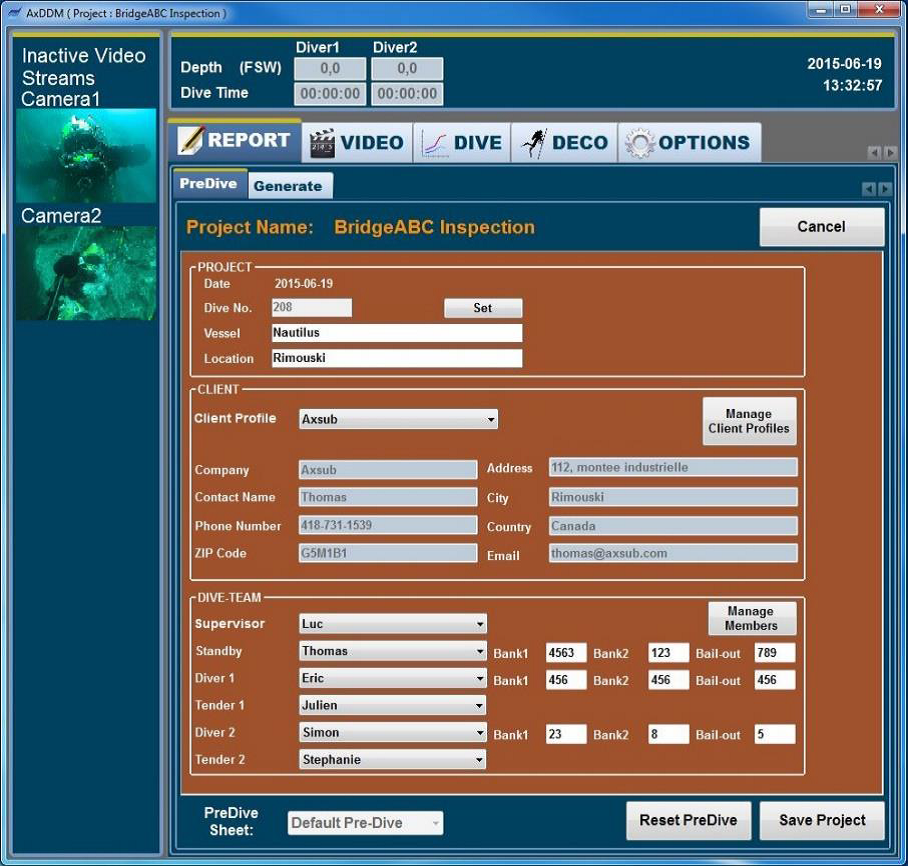
The Pre-Dive page is used to write most of the information to be printed on the dive report. By default, the Default Pre-Dive sheet is selected, and this sheet is used to produce the generic AXSUB report which can be easily modified.
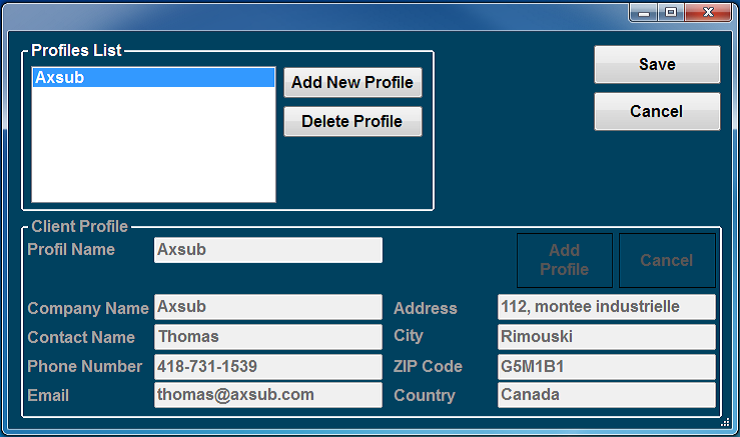
The Client box is to set all contact information about the client. To add or delete a client profile, click the Manage Client Profiles button.
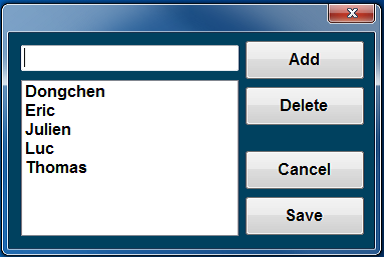
The Dive-Team box is to set the roles of each member and to note the air banks and the bail-out bottles pressures. To add or delete a team member, click the Manage Members button.
Generate Page
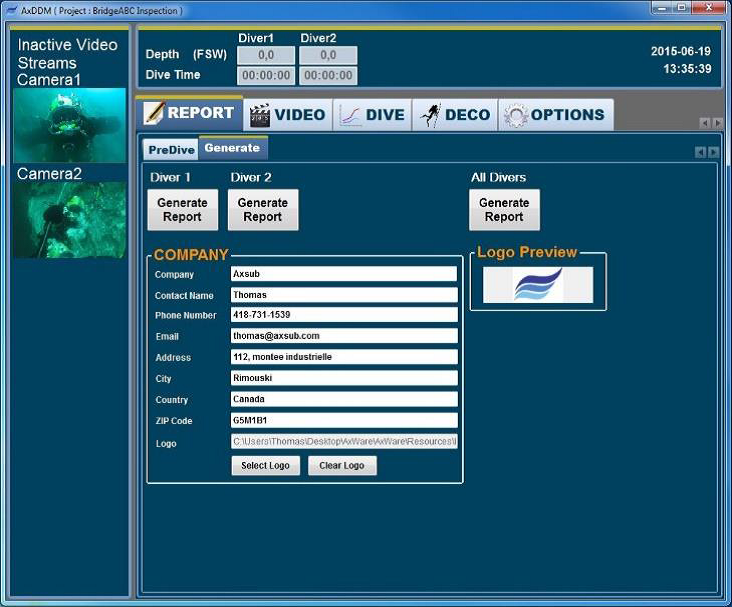
The Generate page is used to write information about the dive-team’s company, to select the logo to be printed on the report and to produce the report itself. To select the logo, click on the Select button and choose a JPEG file from your computer. Once selected, the logo will appear in the Logo Preview box.
System Requirements
Supported Operating Systems (English and French versions):
– Windows 10, 32-bit/64-bit
– Windows 8, 32-bit/64-bit
– Windows 7, 32-bit/64-bit
– Other operating systems might work but are not officially supported by AXSUB
Software Dependencies:
– Microsoft .NET Framework 4.8 (comes installed by default with Windows 10, otherwise available as an offline installer right here)
AxDDM 2.0.50b Download
MPEG-TS (.ts) to MP4 Converter
Remux your video footage easily, without having to re-encode it, simply by drag-and-dropping it on this handy executable.
Software Instruction Manual
AxVIEW User Manual (Freshly updated!)
Standard Definition PVRs
Users of memory cards with a capacity exceeding 32GB are advised to use this application.
SD Card Format Tool
High Definition PVRs
SD Card Format Instructions
Video Preview
The video preview for each camera can be seen in the corresponding Diver page of the Video tab. The previews are designed to always keep their height to width ratio. This way, the main window can be resized at any time without losing the video’s proportions. The video preview will always adapt itself to best fit the screen, thus if the width limits the size, the video will take all width and fill empty space with black borders, and if the height limits the size, the video will take all height and fill empty space with black borders
Snapshot
To take a picture of what is currently shown by the camera, click the Snapshot button. A preview window will appear on screen to show the taken picture for a definite amount of seconds and will then close automatically. The display time can be set in the Video Options tab.
On Screen Display
The OSD (on screen display) buttons are used to add text on the top left corner of the video. There are 3 pre-set OSD texts that can be added, which are the date and time, the diver number and the current depth with units. When clicked, their buttons will turn red to indicate their new status. There is a fourth OSD button that allows user to add custom text. When clicked, this button will open a window with a textbox to write the custom text.
Timers
The Video tab contains basic timer tools to help supervisors during dive. The button Show of the Timer box will open a window containing 2 stopwatches and 1 countdown timer.
Multi View
To display both video streams in the main panel, simply select the MultiView page of the Video tab and choose one of the four possible configurations by clicking the corresponding button.
Start New Dive
Here on the dive table you will be able to start loggin depth by clicking on Start Dive button. Once clicked, the text will change to Finish Dive and it will turn red to indicate that the depth is logging. The Dive Time timer and the Bottom Time timer will also start when the Start Dive button is clicked.
Axis Properties
By default, the chart’s axis are auto-scaled to best fit the depth curve. It is however possible to use custom axis values on the depth chart. Click on the Show Axis Properties button to display the axis settings.
Bottom Alarm
The target bottom alarm is a tool made available to the supervisor to remember to click on the Arrived Bottom button when the diver reaches the bottom, thereby printing the time for this event on the report. To set the target bottom, write the target value in the textbox then click on the Set Alarm button. The button will turn red to indicate that the alarm is set. When the alarm is triggered, the Dive tab will start flashing yellow and red, as well as the Diver page for which the alarm is set. This way, the user will know exactly where to go to stop the alarm. Click on the Arrived Bottom button to shut the alarm.
Save Chart as Image
At any time, the depth chart can be saved as a JPEG file containing the chart with its current axis values by clicking on the Save as Image button.
Finish/Reset Dive
Clicking the Finish Dive button means that the diver is back to surface. When clicked, this button will stop depth logging, stop the Dive Time timer and will enable the option to move decompression to a chamber.
Decompression using tables
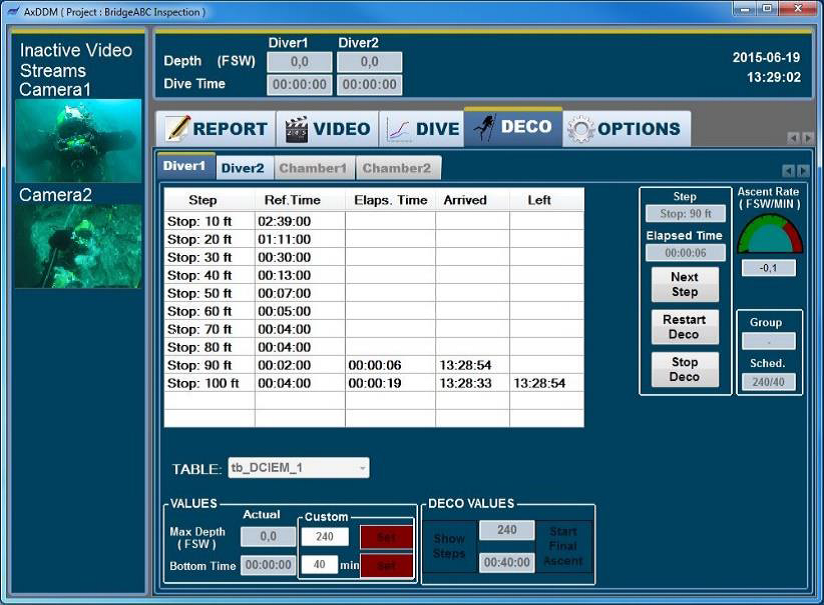
Decompression is a function of both the bottom time and the max depth. Actual values of these variables are stored in the Deco Values box of the Deco tab. When a decompression table is selected in the Table combo box, the Show Steps button will use these values to determine the decompression schedule and show the steps in the spreadsheet. Any value between two decompression schedules will result in the next schedule being selected.
Decompression without table
If no decompression table is selected prior to click on the Start Final Ascent button, step timers will still be available to log the elapsed step time. There won’t be any step name or reference time, but times at which the steps are reached or quitted will be logged. Thus, when printing the decompression spreadsheet on the report, it is possible to fill the missing cells by hand. As with decompression using tables, click on the Next Step button to go to the next step, and click on the Stop Deco button when decompression is complete.
Move to chamber
When the Finish Dive button of the Dive tab is clicked, the Move to Chamber button will appear in the corresponding Deco tab page. This button transfers all dive data to be printed on report to a new chamber tab.
Pre-Dive Page
The Pre-Dive page is used to write most of the information to be printed on the dive report. By default, the Default Pre-Dive sheet is selected, and this sheet is used to produce the generic AXSUB report which can be easily modified.
The Client box is to set all contact information about the client. To add or delete a client profile, click the Manage Client Profiles button.
The Dive-Team box is to set the roles of each member and to note the air banks and the bail-out bottles pressures. To add or delete a team member, click the Manage Members button.
Generate Page
The Generate page is used to write information about the dive-team’s company, to select the logo to be printed on the report and to produce the report itself. To select the logo, click on the Select button and choose a JPEG file from your computer. Once selected, the logo will appear in the Logo Preview box.
Software Requirement
Supported Operating Systems (English and French versions):
– Windows 10, 32-bit
– Windows 10, 64-bit
– Windows 8, 32-bit
– Windows 8, 64-bit
– Windows 7, 32-bit
– Windows 7, 64-bit
– *
* Other operating systems might work but are not officially supported by AXSUB®
Software requirements:
– Microsoft .NET Framework 4.0 (installed by default with Windows 8 and Windows 8.1, otherwise available on Microsoft website)

